Logo Turismo Granada Header

Via ferrata of Cueva Horá

Four itineraries equipped with staples, zip lines, bridges... in the Sierra de Loja.

Downloads

Media Montaña

Medium Mountain

Ferrata

Mountain climbing

Invierno

Winter, Autumn, Spring, All year, Summer

Technical data sheet

Technical Difficulty:
  • Section 1: K1 (beginner level).
  • Section 2: K3 (intermediate level).
  • Section 3: K3 (intermediate level).
  • Section 4: K4 (intermediate-advanced).
Equipment:

305 m.

  • Section 1: 35 m.
  • Section 2: 140 m.
  • Section 3: 90 m.
  • Section 4: 40 m.
Time with stops: 02:11 h.
Details on the duration:
  • Approximation: 0:01 h.
  • Section 1: 0:25 h.
  • Section 2: 0:40 h.
  • Section 3: 0:35 h.
  • Section 4: 0:20 h.
  • Return: 0:10 h.
Details on the difference:

80 m.

  • Section 1: 6 m.
  • Section 2: 30 m.
  • Section 3: 26 m.
  • Section 4: 18m.
Minimum altitude: 1.510,00 m.
Maximum altitude: 1.550,00 m.
Departure point: Camino Charco del Negro-Majada del Tostado, Sierra de Loja, Loja.
Point of arrival: Camino Charco del Negro-Majada del Tostado, Sierra de Loja, Loja.
Closest/s Population/s : Loja.
Municipality/ies: Loja.
Region/s: Loja.
Natural Space/s: Other Areas

Map & Profile

Mapa-Coche-Cueva-Hora-Web
Map "Via ferrata of Cueva Horá"

Full tour

Total distance: 13815 m

Sketch

Waypoints

Point Name Time (*) Height Latitude (**) Length (**)
0 Parking at the trackside -- 1.502 m. N37° 06' 08.3" W4° 10' 03.4"

(*) Approximate times counting stops.
(**) Geographic coordinates. European Datum 1.950.

Introduction

The elaboration of this review has counted with the photographic contribution of Javier García and Jorge Navarro, as well as with that of the Club Aire Libre Treparriscos (Isabel Morón and Héctor Olmeda). 

The via ferrata of Cueva Horá has free access and 4 sections that can be done independently or consecutively. The via ferrata runs from right to left along the wall on which it is installed. The first section has a zip line and a rappel as notable equipment. The second section has a zip line, a Tibetan bridge, a chain passage and a non-obligatory rappel. The third section has a monkey bridge, an overhanging section and a non-mandatory rappel. An optional roof, which can be overcome as a boulder, and a fairly steep section, characterize the fourth and last section, which must be descended on foot.  

This via ferrata is located in the Sierra de Loja, specifically, in the Paraje de las Buitreras, a place located below and to the west of the second highest peak of this mountain range, the Cerro de las Cabras (1642 meters above sea level).

Description

DURATION:

The realization of this activity requires 1/2 day.

DIFFICULTY:

Very high. The realization of a via ferrata requires the knowledge of specific techniques and the use of adequate equipment. As in all climbing activities, there is an obvious exposure to falls with very serious consequences for health. Likewise, there could be rock falls, sudden weather changes or other circumstances associated with mountain activities. The fixed equipment of the via ferrata, on which the progression and fall protection of its users depends (clamps, handrails, belays, lifeline, etc.) may not be in optimal conditions at the time of the activity, since it is a facility open to the public, without permanent control and located outdoors in mountainous terrain. Consequently, it is the responsibility of each user to consult/check if the installation is in good condition before using it, as well as to have the material and master the techniques that would allow him to leave the via ferrata at any time. Never underestimate the risks or overestimate your abilities. In case of doubt, always consult a professional mountain guide.

M. I. D. E. Method (tour Information):

Assessment of aspects 1 to 5.

WATER:

There are no water points nearby, so it is necessary to be well supplied beforehand.

MATERIAL NEEDED:

Individual: comfortable and breathable clothing, hiking boots, high sensitivity gloves ("cut finger" gloves), via ferrata kit (helmet, harness, and specific dissipator set), lanyard (e.g.: 1 safety carabiner and dynamic rope, descender (eight or similar, with safety carabiner), lanyard ring for self-locking knot (for self-locking of the rappel). 1 locking biner and dynamic rope), descender (eight or similar, with locking biner), rope ring for self-locking knot (for self-locking the rappel), warm clothing, water (1.5-2 l.), food, sunglasses, sunscreen, charged cell phone, charged headtorch, pocket knife and lighter.

Collective: 40 m. dynamic rope, double pulley for cable displacement and oval locking biner, and first aid kit.

BEST TIME/S:

Throughout the year.

MAPPING:

Topographic maps National of Spain. Archidona (MTN50 1024) and Loja (MTN50 1025).

LANDSCAPE, FLORA AND FAUNA:

Karstic landscape, highlighting the dolines (circular or elliptical depressions that form on the surface of carbonate rocks) and the lapiaces (small grooves generated on the surface of the rock and separated by ridges or tubular holes). The Sierra de Loja is the habitat of various birds of prey, the goat and the wild cat, and the gallipato, an endemic species that can be seen in the Charco del Negro, on the way to the via ferrata.

REMARKS:

The route through this via ferrata has no escape routes. The only way to leave the equipped sections of the via ferrata would be by rappelling, which would require us to have the necessary equipment and technical knowledge to have a rappel point from which we can safely descend.

The via ferrata should never be done if there is a risk of thunderstorms, since the metallic elements that compose it are excellent lightning rods.

There may never be more than one person on a bridge or zip line, and in vertical progression by means of clamps, we must always respect a safety distance from the person in front of us (at least one stretch of life line).

WEATHER:

ROAD CONDITIONS:

Before doing the via ferrata it is recommended to check the conditions of the via ferrata (state of the equipment) through the comments on the web sites of Deandar. Another option is to try to contact the Sports Department of the City of Loja.

How to arrive by car

From Granada we will go by the highway A-44 in the direction of Jaén and take the output of 125 (A-92G/Malaga/Sevilla/Airport/N-432/Cordoba). At the roundabout, take the third exit and continue along the road N-432, although for a short time, then, without turning, we will be following the A-92G first, and, the A-92 after (past Santa Fé) in the direction of Malaga/Sevilla/Airport. We will continue for a time To-92 to take the output 193 (To-4154/Loja (this)). Following the To-4154, we will partially cross Loja. We will pass several traffic circles until we reach a larger traffic circle with the signs "Guardia Civil/Juzgados" and "Barrio Alto", which we will follow. Already in the Avenida Andalucía of Loja (old N-321), we will continue by it until shortly after the moment in which this road finishes ascending to begin to descend. We will see on our left a sign that indicates the beginning of the path that leads to Lapiaz/Sierra Gorda, way ahead. The road begins ascending through the Pinos de Loja. After 11.6 km. without deviating from the main road, we will take the detour to the right that leads to the Charco del Negro. We will leave Charco del Negro and Cueva Horá on our left and, after 2.4 km. from the detour, we will arrive at the base of the rocky walls where the via ferrata is installed, where we will find trackside parking (point 0) in the same way.

Parking

Available.
Parking exit:

Camino Charco del Negro-Majada del Tostado, Sierra de Loja, Loja.
https://goo.gl/maps/itkxrbgiG6qv8Bws9

Parking arrival:

Camino Charco del Negro-Majada del Tostado, Sierra de Loja, Loja.
https://goo.gl/maps/itkxrbgiG6qv8Bws9

How to get there by public transport

The buses that depart in the direction of Loja do it from the Bus station in Granada which do it at different hours. Once we get to the bus stop Loja, we will have to contact any public transport service so that they can drive us up to Via ferrata of Cueva Horá. When we arrive at the via ferrata we will have to arrange with the carrier to pick us up there at least 3:00 h. later (if we want to do the complete via ferrata) and thus be able to return to the bus stop Loja. The buses depart from the Loja in the direction of Granada also do it at different hours.

Route

From the lane (point 0), the beginning of the via ferrata is a few meters away, slightly up the slope to the right, in the direction of two characteristic and almost symmetrical rock "gendarmes". On the way to the gendarmes we will find some panels that, at the foot of the route, inform us of the characteristics, and the rules of use, of the installation.

Section 1 of the via ferrata begins by ascending to the top of the gendarme located on the left side. To do this we will use a vertical row of staples that also belongs to the beginning of Section 2. Once located on the gendarme, we will make a traverse to the right and reach the zip line that connects the gendarme on which we are located with its twin. This zip line will force us to pull our arms to completely clear it. From the top of the second gendarme, an equipped anchor will allow us to descend to the ground by making a rappel 6 meters high. This first section of the via ferrata is specially designed for uninitiated users and children over 8 years old. The rest of the via ferrata is for beginners.

Gendarme al que conduce la tirolina del Tramo 1  y desde el que se rapela
Gendarme to which the zip line of Section 1
and from which it is rappelled.

Section 2 also begins by ascending to the top of the gendarme on the left. Once there, a short traverse, this one to the left, will lead us to a new zip line. This second zip line will also require us to use our arms.

Tirolina del Tramo 2
Section 2 zip line

Once the zip line is cleared, we will make a somewhat athletic side traverse and continue ascending, overcoming small overhangs. This vertical section will lead us to a Tibetan bridge located 30 meters above the ground.

Hilada vertical de grapas previa al puente tibetano del Tramo 2
Vertical staple stringing prior to the Tibetan bridge of Section 2

Puente tibetano del Tramo 2
Tibetan bridge Section 2
Salida del puente tibetano del Tramo 2
Exit of the tibetan bridge Section 2

Once we have crossed the Tibetan bridge, we will continue on the traverse and then ascend diagonally to reach a crevasse through which we can "sneak in". Some chains will allow us to hold on to them with our hands to, in opposition, climb about 10 meters through the crevasse. Penetrating and climbing through the crevasse increases the difficulty of this second section of the via ferrata up to K4. However, when we reach the entrance to the crevasse, we can choose to continue to the left and follow a vertical line of clamps with some overhang.

Entrada a la grieta (paso de cadenas) del Tramo 2
Entry to the crack (step-chain) of Section 2
En la hilada vertical de grapas con cierto desplome una vez evitada la entrada a la grieta (indicada con una flecha) del Tramo 2
In the vertical row of staples with some slump once the entry to the crack
(indicated with an arrow) of Section 2 has been avoided.
Subida en oposición de la grieta del Tramo 2
Rise in opposition to the crack of Section 2

At the top of Section 2, we can choose to head towards the anchor of a 20-meter-high rappel or continue to the left, far enough away from the ledge of the wall, and walk down an obvious channel to the left of Section 4.

“Ferrateros” en el Tramo 3, vistos desde la cabecera del rápel del Tramo 2
"Ferrateros" in Section 3, seen from the anchor of the rappel in Section 2.
Rápel del Tramo 2
Rappel Section 2

The beginning of Section 3 is located to the left of the rappel exit of Section 2. This third section of the via ferrata runs diagonally, always close to the ground. We will start alternating vertical and horizontal rows of clamps, and, towards the middle of the route, we will find a monkey bridge.

En el puente de mono del Tramo 3
In the monkey bridge of Section 3

After crossing the monkey bridge, we will continue alternating traverses and ascents until we reach an overhanging area. After the overhang we will find the anchor of a 16-meter high rappel that will allow us to descend back to the base of the wall.

Tramo 3, concurrido
Section 3, concurred
Evitando el rápel del Tramo 3 saliendo por arriba
Avoiding the rappel of Section 3 by exiting from above
Preparando el rápel del Tramo 3
Preparing the abseil for Section 3
Parte final del Tramo 3 visto desde el inicio del Tramo 4
Final part of Section 3 as seen from the beginning of Section 4.

From the exit of this second rappel, climbing close to the wall, we will reach a shelter with a low ceiling that constitutes the beginning of Section 4 of the via ferrata. The roof, being equipped with clamps and lacking a life line, is overcome by bouldering, i.e., a fall, even if we are close to the ground, could cause a strong impact against it.

Inicio del Tramo 4
Beginning of Section 4
Superando el techo situado al inicio del Tramo 4 practicando búlder
Overcoming the roof set at the beginning of Section 4 practicing bouldering
Tramo 4
Section 4

The alternative to the roof is to climb a rock and face the steep drop above it. Once over the drop, the vertical line of staples will lead us to a traverse. Next, we will find a new shelter that we will leave to the left and we will soon reach the end of the via ferrata, when we reach the top of the wall.

The descent from the top of the wall will be done on foot, following the channel located to the left of it. Once at the base of the wall, we will descend the slope until we get to the lane (point 0), where our vehicle will have been parked, always nearby.

The tracks for GPS in general, and, in particular, registered in ravines, corridors, corners and other tight places, generally contain inaccuracies.

Most of the GPS reflect the graphic scale of the map in the screen. As we activate the zoom of the device, the scale of the map will vary. If we “get closer to the ground,” the scale of the map decreases, and, consequently, we see a smaller amount of “ground” than if we “get away” from it, that is to say, that we increase the scale of the map.

When you follow a downloaded and previously stored track in our GPS, we must ensure that the scale of the map on which the path appears is never too small. We will seek to “get away” from the floor, and we will not obsess with faithfully following the stored track , because we may not notice the inaccuracies that the latter contains.

The precision of the GPS is used to record the route was a, and the GPS that we are using for doing it is another, and therefore, it will be impossible that the points of both tracks, which serves us as a guide and that we are recording, match at 100%. It is for this reason that, even with a single way to move from a particular place, let us note that the track serves us guide runs several meters to the right or to the left of our location.

This website is translated into English. Please note that, in general, there may be a discrepancy between the Spanish and English versions, due to the translation process, and the interpretation that may exist in different countries of the specific terminology of the proposed activities. The Provincial Council of Granada advises the user to be careful when following the instructions on the site, and to consult an expert in case of doubt. The user is aware of the importance of carefully reading these warnings. The use of this website implies the full acceptance of the terms and conditions contained in this legal notice.

Responsibility

The Provincial council of Granada can not assume any liability arising out of the misuse, improper or unlawful use of the information displayed on the Internet page of www.exploregranada.es.

The Provincial council of Granada disclaims any liability resulting from the misuse of the content of its website and reserves the right to update, remove, and restrict or block access when deemed appropriate. It is recommended that each one of the users is responsible and prudent in the mountain. In any case, the user has to take the necessary precautions, for its use involves the exercise of a high-risk activity.

The Provincial council of Granada is not responsible for possible security errors that could be caused by the use of computers infected with viruses. Neither is responsible for the errors caused by the use of browsers with non-updated versions.

The Provincial council of Granada is not responsible for the information that is displayed on web pages outside connected directly or indirectly by links to the page www.exploregranada.es.

The elaboration of these reviews has required the previous realization of the specific activity.

All times described are effective and indicative, having taken into account for their calculation an average group of participants, an average capacity of these and the minimum stops for refreshments and rest.

The information contained in this Website is to effects indicative of tourist practice or sport.

In no case does it involve the organization by the Provincial Council of Granada of the activities described herein.

The properties through which the itineraries run are not owned by the Provincial Council of Granada.

Neither corresponds to the same its maintenance.

In any case, the user has to take the necessary precautions for its use involves the exercise of a high-risk activity.

The equipment, signaling, and any other type of installation on the route may also suffer unforeseen variations with the passage of time, for various reasons such as weather, deterioration, or vandalism; therefore it is strongly recommended to be accompanied by a guide if you do not know the terrain or the situation in which the signaling or equipment are located.

Also, we invite you to document yourselves with books and specialized guides to complement the information described on this website.

Pre-plan the activity. You should obtain reliable and proven information about the route and the activity that is intended to perform, in terms of the physical demands, technique, equipment necessary to make it, etc, In this “design phase” of the activity is where you can act on those elements that generate the risk that the activity entails.

Inform yourselves about the weather in the area. Do not forget that the weather in the mountain is very variable. Today, there are numerous possibilities of obtaining this information. This information is valuable to analyze, evaluate and assess the tolerability of these risks (rain, snow, storms, wind, etc.) which may be present or to accompany the activity. The paths may vary a lot depending on the time of the year and the weather conditions, therefore it is recommended to pay attention to the recommendations made in this regard and check the weather before each departure.

Each one of the participants of an activity must assess whether the weather is or not adverse to their own physical condition and skills to cope with this activity and it is your responsibility to do it or not.

Confirm in the area the prior information. Once you have arrived at the area of the activity to confirm the information previously acquired on the condition of the trails, roads, the snow conditions, weather, water level of the rivers, the situation of the sea to the specific activities that develop there, equipment that could have the sports facility, in case you need them, and dangers arising lately in the path and/or activity etc

This information can be confirmed in the information centers, mountain guides, shelters, Police, etc., The information contained in this website is based on optimal conditions and equipment in good condition to do the activity, and it is not the responsibility of the Provincial council of Granada the conditions of the sport equipment.

Adapt the activity to our physical conditions. Be modest and learn to resign. You have to know to renounce, even though one is very experienced. The mountain will always be there and will wait for us. Always put first the safety of the collective, second the safety of the individual. You should never be too self-confident or lessen your focus, no tter how easy the activity is. The physical ability is fundamental to the realization of any activity in the mountains, so there is no overvaluing our physical abilities, and we have to know how to adapt the paths to our terms. In case of not having sufficient capacity, users should refrain from doing the routes.

Adapt the activity to our technical conditions. For the carrying out of any activity in the mountain and more those that involve some risk, it is necessary to have knowledge of the specific techniques and necessary to carry them out; so we recommend people who do not have the necessary knowledge to refrain from performing any activity, even those that seem easier like hiking. The simple reading of the reviews contained in this website do not train any person for practicing the activity. It is always recommended the accompaniment of guides and staff specialized in the mountains.

Likewise, it requires a prior and deep understanding of the medium in which the activity is carried out, as well as the right time and the optimal conditions to carry it out.

Personal technical equipment. It is absolutely essential to bring the technical material, clothing, footwear, specific documentation, equipment, sun protection, food and water, etc., necessary to perform sports activities. If the activity is of high commitment, it should be expanded to first aid kit and emergency resources. The equipment must be perfectly revised and adjusted to the information and pre-planning.

Subjective objective risks inherent in all sport activities on the mountain. In all athletic activities on the mountain there is an evident exposure to falls with very serious consequences, which may be, but not limited to: brain Trauma, in limbs due to slipping on rocks, in the jumps without any visibility of the bottom, poor reception to the water in the jumps, assurance deficient in the descent of rappelling, extreme tiredness, excess of confidence, lack of preparation or equipment for the activity, inappropriate use of material, hypothermia, and dehydration.

This type of sporting activity involves risks that each participant must know and assume.

We must never underestimate risks and overestimate our capabilities.

It is possible that the fixed equipment the activity counts on (ravines, climbing, etc) and that depends on the progression and/or the protection against the fall in some sections, is not in good condition, as we do not have a regulated periodic maintenance. It is the responsibility of each user to see/check if the material is in good conditions and judge whether or not they can trust in it before you use it.

There are activities which develop in the snow, in places that are very exposed, or in the inside of a course of water, and depending on the time (during defrost, immediately after a snowfall, after a period of rain or storm), could dramatically increase the flow becoming very technical and dangerous. We must never underestimate risks and overestimate our capabilities.

This type of sporting activity involves risks that each participant must know and assume.

As well as an activity in the nature, there may be rock falls, landslides or trees, etc

Guides. In case you go with a guide, you must follow the instructions of the guides, coordinators, or people with more experience, preventing situations of risk, personal or groupal. It is necessary to put in the knowledge of the guides or companions of the activity any possible injury or incident which may affect the development of the activity before and during the athletic activity in nature.

The participants in the activities contained in this website must possess sufficient knowledge and the physical capacity which will enable you to make the specified activities, and to deal with them they must have sufficient capacity, technical and physical, so that they can do it independently and safely. Likewise, they assume the risks inherent in this type of activities and have the knowledge and the equipment needed to perform the activities, and must be approved by the U. E. and in optimum condition for your use.

Do not go alone to the mountain to perform the activity. If you do so, limit yourselves only to places with prior experience, known and consistent with your physical ability and technique. Except in exceptional circumstances, never to leave alone a member of the group, and much less if they're injured or fatigued.

Report on the activity and planned itinerary and respect what has been planned. Communicate to someone (shelter, camping, hotel, friends, relatives) the place and the activity to be performed. And importantly, even if sometimes it is cumbersome, it is imperative to warn that same person of the end of the activity. This recommendation is essential when trying to perform a solo activity.

Graduations. The participants of the activities should be trained to perform the activities in function of the graduation set for each activity, so it is your responsibility to know these rankings and the risks that it involves, therefore you assume performing the activity and everything that could happen.

Learn how to orient yourself. Carry GPS, mapping of the area and compass. You can not trust everything to the GPS, in certain situations it may fail. With a proper handling of the compass and map, we can reduce the risks and prevent accidents.

The tracks for GPS in general, and, in particular, registered in ravines, corridors, corners and other tight places, generally contain inaccuracies.

Most of the GPS reflect the graphic scale of the map in the screen. As we activate the zoom of the device, the scale of the map will vary. If we “get closer to the ground,” the scale of the map decreases, and, consequently, we see a smaller amount of “ground” than if we “get away” from it, that is to say, that we increase the scale of the map.

When you follow a downloaded and previously stored track in our GPS, we must ensure that the scale of the map on which the path appears is never too small. We will seek to “get away” from the floor, and we will not obsess with faithfully following the stored track , because we may not notice the inaccuracies that the latter contains.

The precision of the GPS is used to record the route is one, and the GPS that we are using for doing it is another, and therefore, it will be impossible that the points of both tracks which serves us as a guide and that we are recording, match at 100%. It is for this reason that, even when there is only one way to travel a particular location, let us note that the track that serves us as a guide runs several meters to the right or to the left of our location.

The activity in the mountains is not finished until we return to a safe place. The summit is only half of the journey. Do let your guard down until you're completely safe. This includes returning home in your car. There are too many mountain sports practitioners who have road accidents after a tough activity.

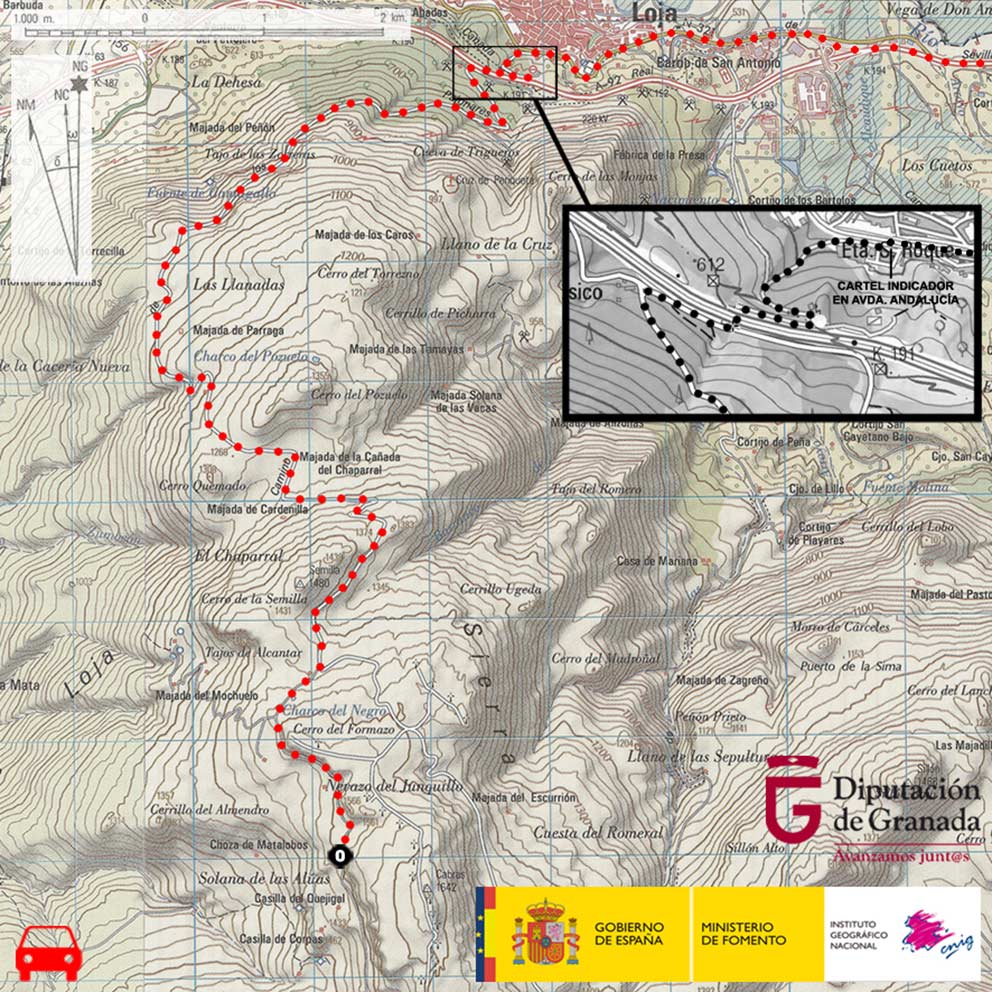
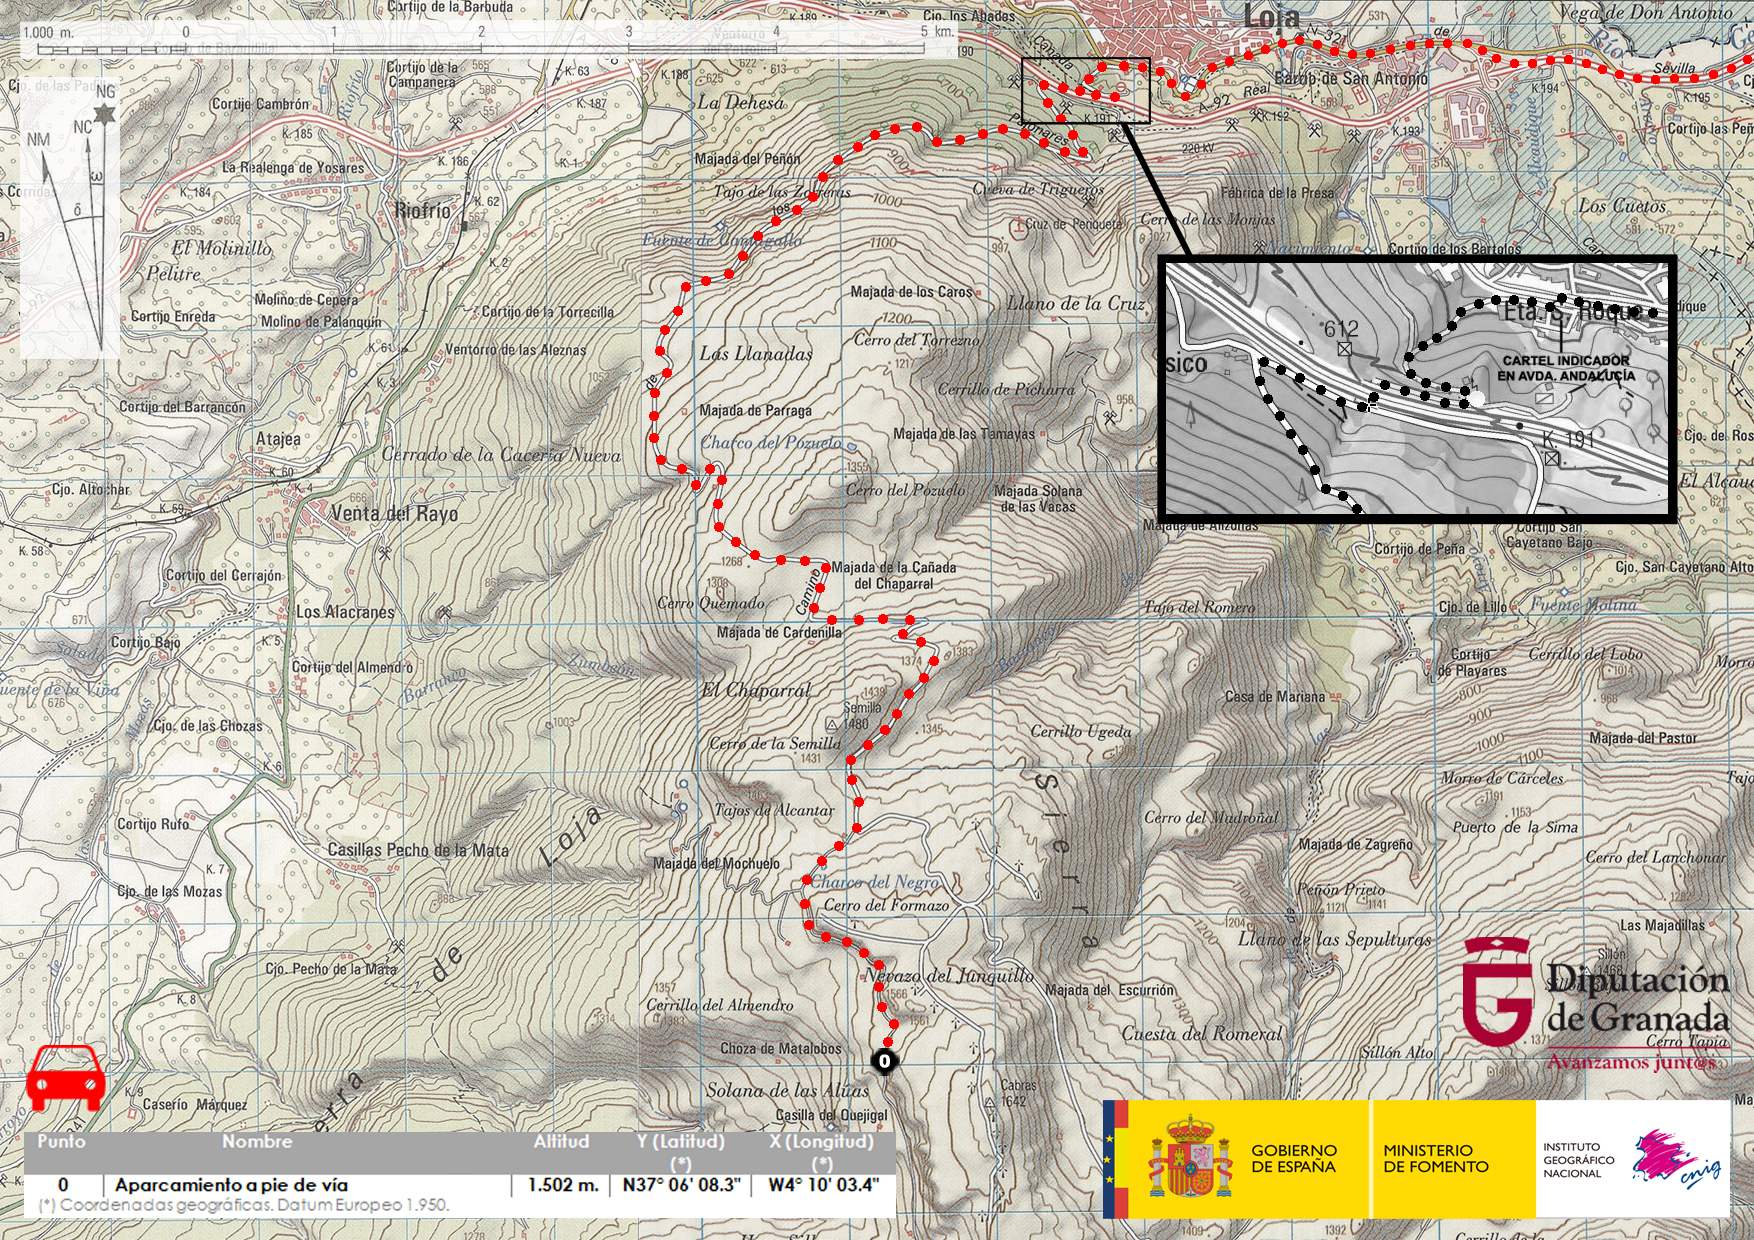
The digital mapping used in this website has been generated by the IGN (National Geographic Institute), to be used according to the conditions of the license of use and in accordance with the Ministerial Order FOM/2807/2015.

If there's any accident alert the emergency number, and even the family members or emergency contact. Every minute is important. To meet this recommendation is necessary to carry a mobile phone with charged batteries or any other means of communication to launch the alarm. The GPS is very useful to properly communicate our position and to facilitate our location. In Spain, the monst useful emergency phone numbers are 112 (Civil Protection), 062 (Civil Guard).

The Provincial council of Granada is not responsible for the correct or incorrect use which might be made of this summary, and the consequences that may arise from it. For this reason, it is recommended to the users to be responsible and prudent while carrying ouit the activities on this website. The use of these reviews implies the user will assume the inherent risks of the activity and involves the recognition of their sole responsibility for the security during the development of the activity. The simple reading of the reviews contained in this website do not train any person to practice the activity. It is always recommended to be accompaniment by guides and staff specialized in the mountains.

The various activities contained in this website, are part of what are considered to be risk sports, and they require learning and experience. This website provides technical information for many sport activities in nature, existing at present in the province of Granada, without managing to include, on occasions, information about the state of conservation and maintenance of the routes, facilities or equipment, if there's any. Therefore, the security contiditions for each and every proposed activity are not guaranteed.

The Provincial council of Granada does not assume in any case any responsibility for accidents that may occur while performing the activities listed here.

The information contained in this website is not intended to replace in any case, the experience of participating in sporting activities in the nature, who should be aware of the risks associated with the practice of these sports that are presented here and assume the responsibility to address these risks.

Some of the areas included in this guide are located within protected natural spaces subject to specific legislation and that the mountaineer should know beforehand.

The Provincial council of Granada does not assume in any case, the legal consequences of any infringements against the current legislation.

For any suggestion, the Provincial council of Granad invites you to send an email to the Contact from the web www.exploregranada.es.